When your HVAC system isn’t working properly, it is nothing to laugh about. Especially during the summer heat, it can sometimes feel like you are in a desert being cooked by the sun and slowly melting away from the sweltering humidity. HVAC technicians and professionals can save the day by fixing and fine tuning an HVAC system to perfection with the right tools and troubleshooting techniques. One very important troubleshooting measurement that can help determine proper refrigerant charge and system efficiency is superheat. Superheat is especially important in HVAC systems containing a fixed metering device, and superheat measurement is the primary method to determine proper refrigerant charge.
The Air Conditioning Process
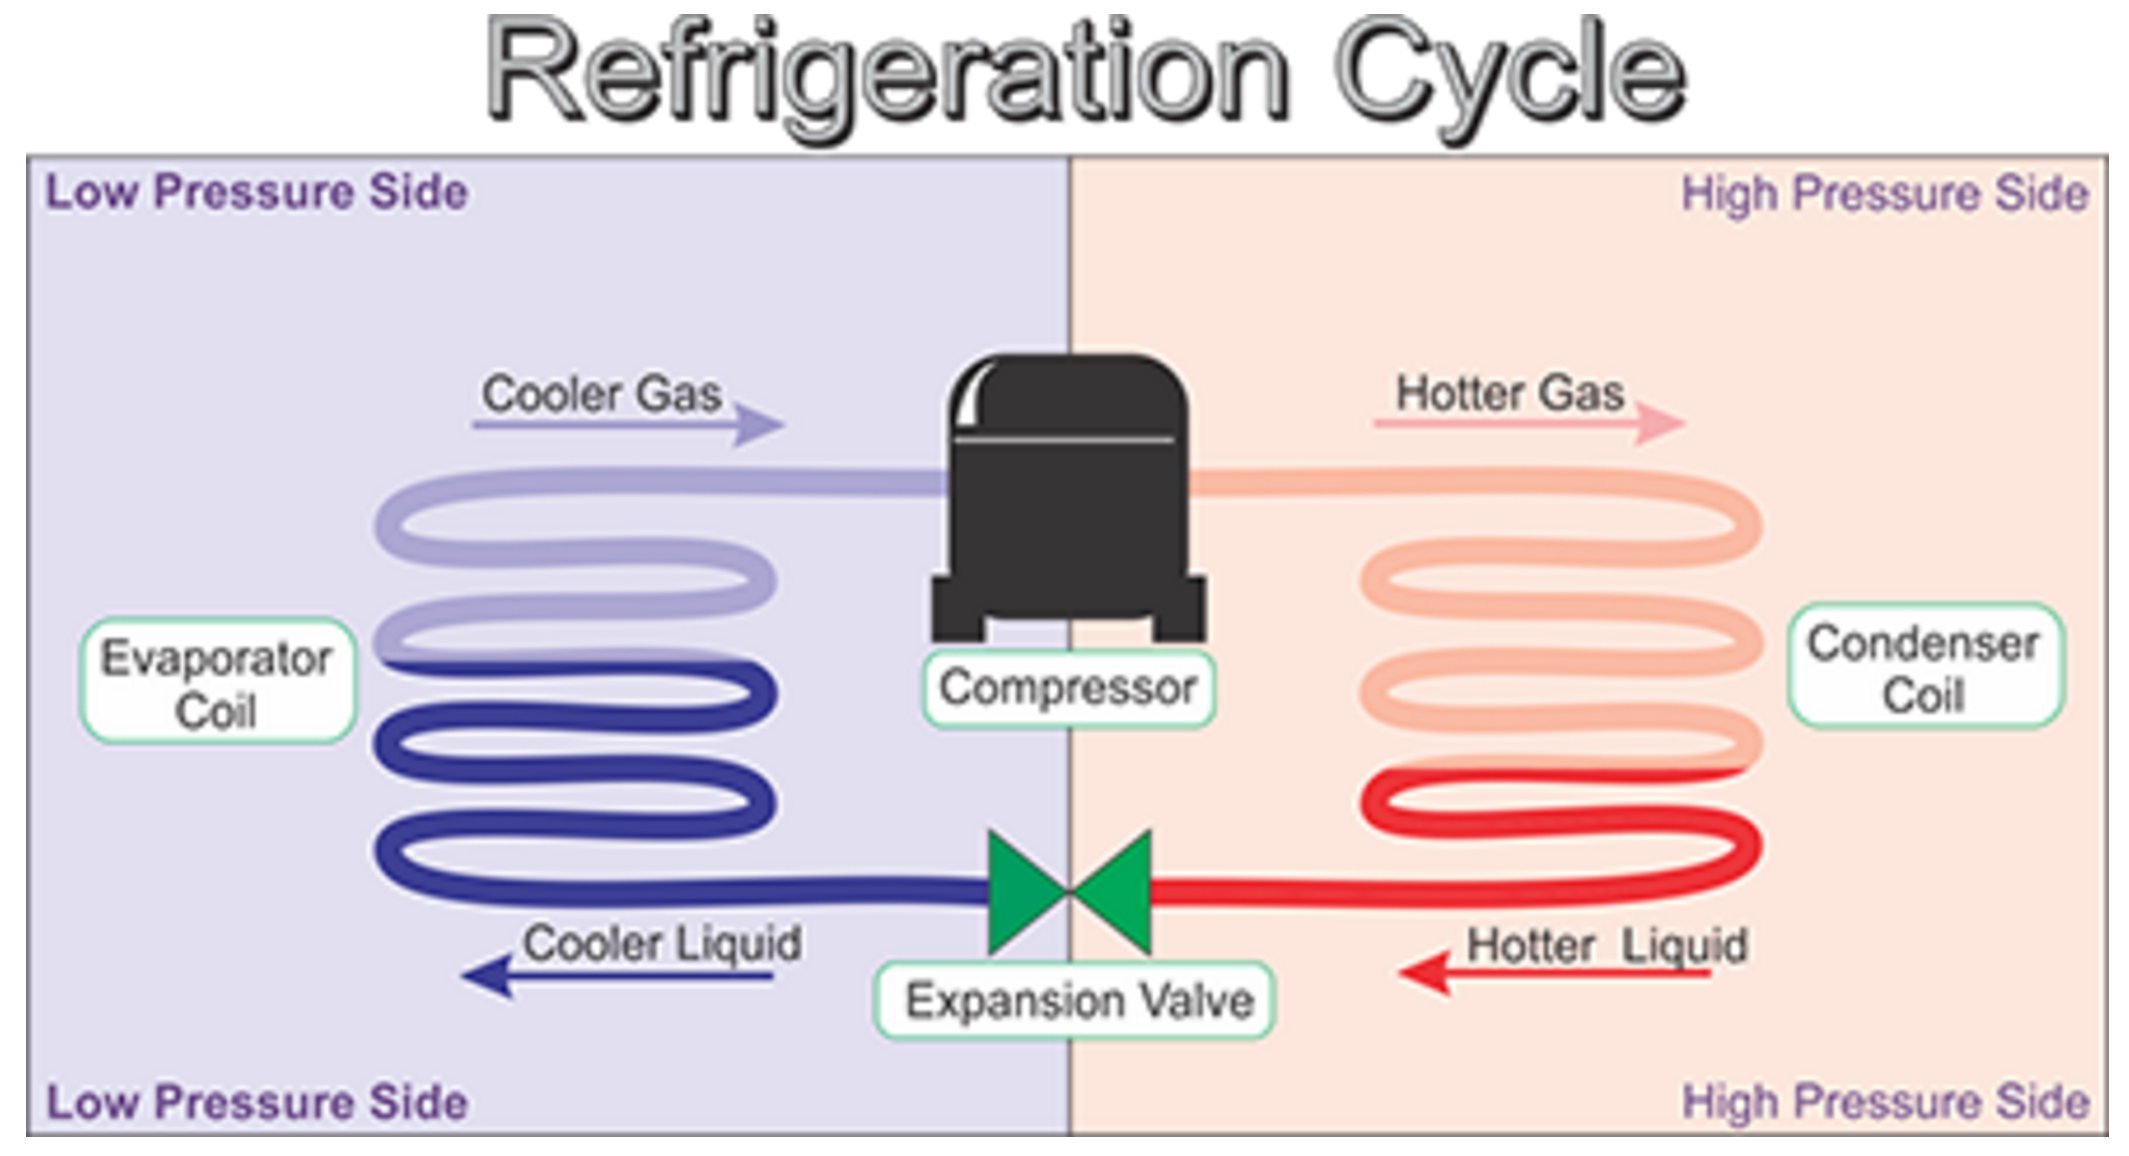
To understand what superheat is, one must understand the air conditioning process. The air conditioning process is based on the fundamental that heat moves innately from warmer to cooler spaces. In the following, I will explain the steps in the air conditioning process.
- The first component I will address is the AC compressor. The compressor is known as “the heart” of the air conditioning system because it pumps the refrigerant through out the system. It takes low pressure, low temperature vapor and compresses it into a high pressure, high temperature vapor.
- The second component is the condenser. The compressor raises the boiling point of the refrigerant to a level that will allow the air or water moving across the condenser coils to condense the high pressure, high temperature vapor refrigerant into a high pressure liquid. The outdoor ambient air is at a cooler temperature then the refrigerant and as air or water blows over the condenser coils, heat is dissipated from the refrigerant. The refrigerant is then able to condense to a liquid. The saturation temperature, in regards to subcooling, is the temperature of the refrigerant when it changes phase from a vapor to a liquid.
- The third component is the metering device. The metering device receives high pressure liquid refrigerant and regulates the flow of refrigerant into the evaporator coil. A metering device will either be a fixed metering device or a thermal expansion valve (TXV or TEV).
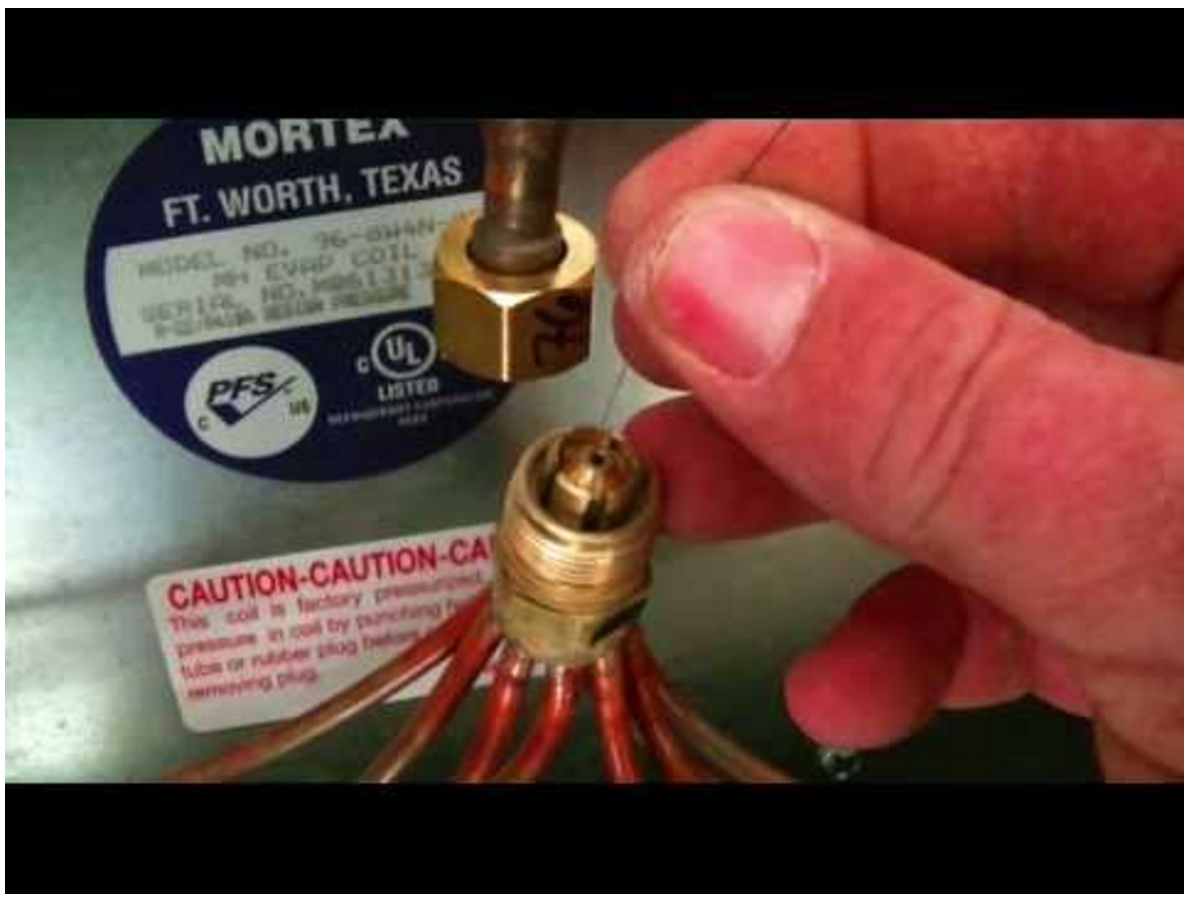
- Fixed metering device- If an air conditioning system contains a fixed metering device, such as a piston, the correct method of evaluating refrigerant charge is superheat. The fixed orifice metering device, containing a piston, produces a steady flow of refrigerant into the evaporator coil. The orifice size in the piston determines how much liquid refrigerant enters the evaporator coil. HVAC systems containing a fixed metering device must be more precisely charged as there are no devices that change flow rate of the metering device. A TXV is more efficient and flexible regarding refrigerant charge because it bases flow rate on temperature and pressure. See the picture above of a fixed metering device.
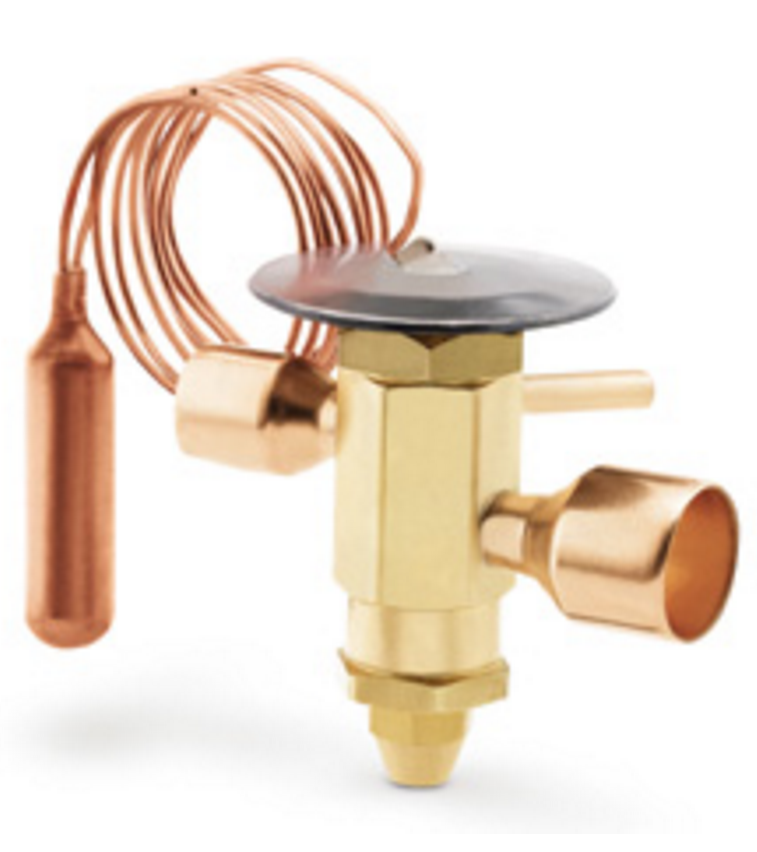
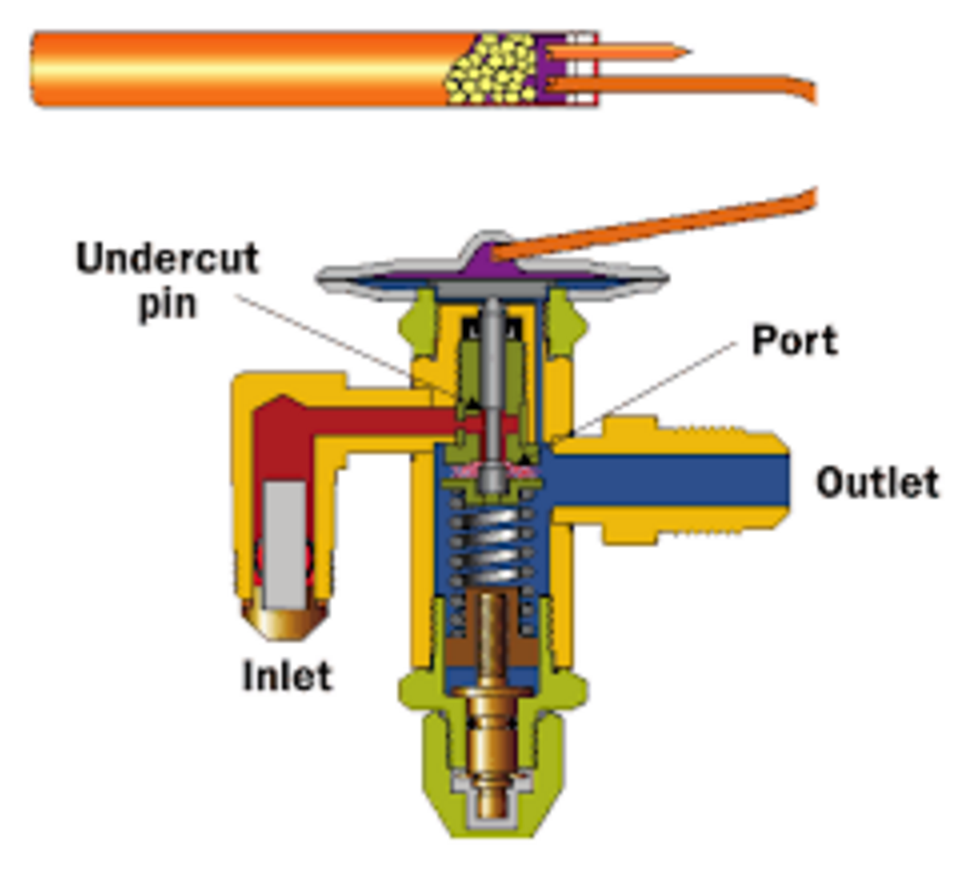
- Thermostatic Expansion Valve (TEV or TXV)- If the system contains a TXV, then measuring subcooling is the correct method of evaluating refrigerant charge. A TXV regulates the rate of liquid refrigerant that flows into the evaporator. The TXV maintains the proper supply of refrigerant by matching this flow rate against how quickly the refrigerant evaporates in the evaporator coil. The TXV responds to the temperature of the refrigerant as it leaves the evaporator and the pressure in the evaporator itself. The TXV contains a sensing bulb attached to the suction line, which constantly reads the temperature. The TXV regulates refrigerant flow by using a movable valve pin against spring pressure to precisely control the flow of liquid refrigerant let into the evaporator coil. See the picture below of a TXV valve.
- Fixed metering device- If an air conditioning system contains a fixed metering device, such as a piston, the correct method of evaluating refrigerant charge is superheat. The fixed orifice metering device, containing a piston, produces a steady flow of refrigerant into the evaporator coil. The orifice size in the piston determines how much liquid refrigerant enters the evaporator coil. HVAC systems containing a fixed metering device must be more precisely charged as there are no devices that change flow rate of the metering device. A TXV is more efficient and flexible regarding refrigerant charge because it bases flow rate on temperature and pressure. See the picture above of a fixed metering device.
- The fourth component is the evaporator. The evaporator receives a specific amount of refrigerant from the metering device. Warm air blows over the evaporator coil, adding heat to the the refrigerant, evaporating the liquid refrigerant to a vapor. The saturation temperature, in regards to superheat, is the temperature of the refrigerant when it changes phase from a liquid to a vapor. The evaporator removes heat from the ambient air and absorbs it into the refrigerant. The evaporated (vapor) refrigerant is then carried to the compressor to repeat the cycle.
Superheat
Superheat exists at the evaporator. After passing through the metering device, refrigerant immediately enters the evaporator. Warm air blows over the evaporator coil and heat is absorbed by the refrigerant, while the liquid refrigerant is at its boiling point. When the liquid refrigerant reaches its boiling point, it changes state from a liquid to a vapor. The temperature required to change the refrigerant from a liquid to a vapor is known as the saturation temperature. Any additional heat absorbed by the refrigerant above the saturation temperature is called superheat.
The high pressure liquid refrigerant being fed from the condenser into the metering device is forced through the metering device opening, which lowers the pressure of the refrigerant. The low pressure refrigerant will lower the boiling point and make it easier for the refrigerant to absorb heat from the circulating air. The saturated temperature (boiling temperature) of the refrigerant is at a lower temperature than the air flowing over it and therefore it is able to absorb heat from the air. The air leaving the evaporator will therefore be colder and create the effect of conditioned air.
Methods of Measuring Superheat
Now that we have gone over the basics, we will go over the proper methods in measuring superheat. Measuring superheat helps determine the proper charge for systems containing a fixed metering device. Ensure the system contains a fixed metering device before measuring superheat. We recommend any HVAC diagnostics be completed by a certified HVAC technician or professional. Refrigerant exposure is dangerous to your health and if you feel uncomfortable in any AC diagnostic work, please call a qualified professional.
- With the HVAC system not in operation, connect the manifold gauges to the suction line port at the service valve and use a quick connect low loss fitting. Use manifold gauges that are for the specific type of refrigerant that the system contains. For example, if the HVAC system contains R-410a refrigerant, use the manifold gauges that you only use on R-410a systems to prevent contamination.
- Turn the thermostat to cool and set the target temperature at least 10 degrees lower than the indoor temperature.
- Let the system operate for at least 10 minutes to let pressures equalize. Record the suction line pressure.
- Use a temperature measuring device to measure the temperature of the suction line. Place the temperature measuring probe on the copper tubing of the suction line, on a fairly clean spot (clean if necessary for proper reading), about six inches from the suction line service valve. Ensure the temperature probe is secured tight enough for proper reading. Record the measurement of the suction line temperature.
- Take the suction line pressure, recorded earlier, and find the evaporator saturation temperature by completing either of the following steps;
- If the low side manifold gauge you are using has a saturation temperature chart, view the pressure reading on the low side manifold gauge then take a ruler or piece of paper and line up the pressure measurement with the corresponding temperature chart. For example, view the example picture of the low side manifold gauge, below.
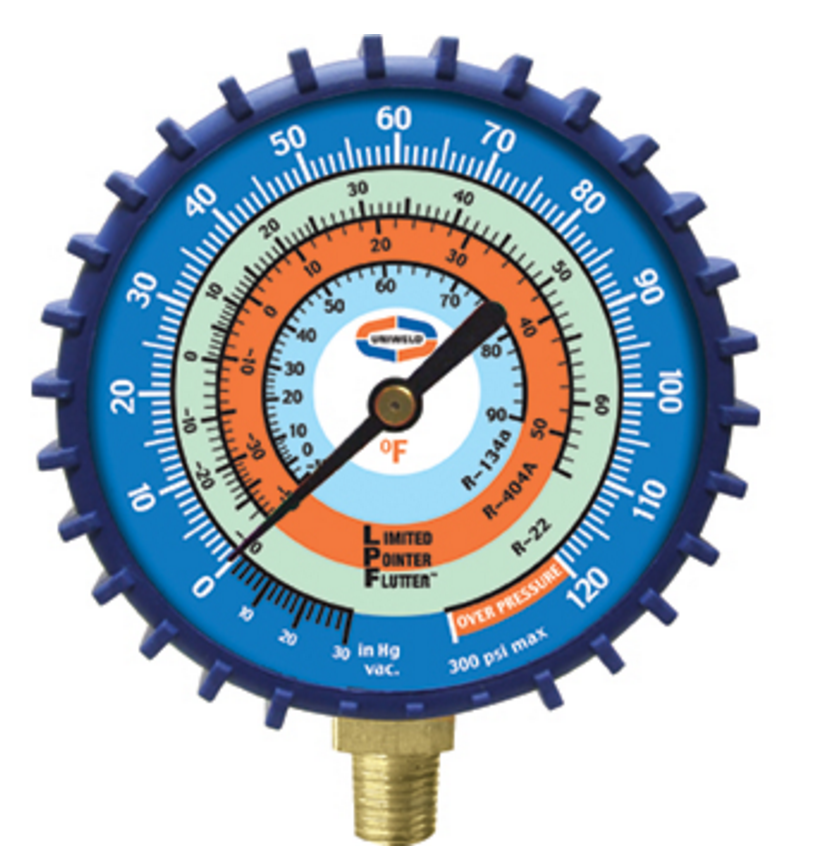
(Note: Most of the Low Side Manifold Gauges are the color blue and the High Side Manifold Gauge is the color red) The outer measurements recorded on the gauge is pressure. The charted recordings listed inside the pressure readings are the saturation temperatures of different refrigerants.
- (View the Low Side Gauge pictured above for reference) Say you have a low side pressure reading of 76 psi on a HVAC system containing R-22 refrigerant. Take a piece of paper or something with a straight edge and line up 76 psi with the temperature readings colored in green for R-22. You will get the temperature of approximately 45 Degrees Fahrenheit. 45 Degrees Fahrenheit is the evaporator saturation temperature. At 76 psi and 45 degrees Fahrenheit the liquid refrigerant will change state into a vapor.
- If the low side manifold gauge you are using does not have a saturation temperature chart for the refrigerant you are examining then use a temperature pressure chart.
- (View the Pressure Temperature Chart pictured below for reference) Again, say you have a low side pressure of 76 psi on a HVAC system containing R-22 refrigerant, view the pressure temperature chart and find 76 psi and follow it across to the R-22 column. The evaporator saturation temperature on the chart, reads 45 degrees Fahrenheit. We get the same results for either method.
- If the low side manifold gauge you are using has a saturation temperature chart, view the pressure reading on the low side manifold gauge then take a ruler or piece of paper and line up the pressure measurement with the corresponding temperature chart. For example, view the example picture of the low side manifold gauge, below.
- Now use the following formula to determine superheat:
Suction Line Temp - Evaporator Saturation Temp = Superheat
- As an example, if the suction line temperature is 59 degrees Fahrenheit, and using the figures from the above example;
Suction line temp = 59°F
Evaporator Saturation Temp = 45°F
Superheat = 14°F
Superheat Example Equation: 59°F - 45°F = 14°F
- There are digital manifold gauges that will determine the superheat calculation for you automatically. The gauges have the pressure temperature charts for each refrigerant saved in there programming and will constantly calculate superheat and show a reading. There are no calculations needed on your end.
Tools Required to Test For Superheat
There are several HVAC testing instruments that can be used to determine superheat. The right testing instrument can save a technician a great deal of time and effort. These tools must be properly maintained and calibrated to get accurate results. Below, we will go over essential HVAC tools needed to test for superheat.
- Manifold Gauges- these are used to test operating pressures.
- Mechanical- these gauges simply measure operating pressures and may have the saturation temperature chart recorded on the gauges.
- Digital- these gauges tend to be more accurate as there is less user error. Most digital gauges have accessories, such as temperature probes, that measure surface temperatures with high accuracy. These types of gauges also calculate subcooling and superheat automatically for the user, while temperature probes are attached.
- Psychrometer- A psychrometer is an important tool when testing for superheat. Dry bulb and wet bulb temperatures need to be taken with a psychrometer to determine proper superheat. We recommend using the General Tools Psychrometer.
- Multi-Meter that measures temperature- Most high end Multi-Meters can measure temperature. You will need the accessory temperature probe that corresponds with your specific meter.
- Temperature Testing Instruments- There are several temperature testing instruments available. Accuracy is very important when determining superheat. Measuring surface temperature in the most accurate way is an important aspect for this measurement device. The temperature testing device used should have accuracy of +/- 1°F. Clamp type probes are easier to use rather then K type bead thermocouples because they are easier to secure to the copper piping.
Determining Req Superheat for Specific Equipment
When determining the proper level of superheat for a specific HVAC system, following the manufacturer's specifications is always the best method. Normally, this information is listed on a “charging chart” on the inside of the condenser electrical panel. It is also listed in the installer manual or specifications manual included with the equipment. If you are unable to find this information, call a manufacturer technical rep and ask for this information. To determine the proper level of superheat needed in a system follow the steps listed below.
- First, you must use a psychrometer to take temperature measurements.
- Set the psychrometer to read wet bulb temp and take the temperature of the air at the return air intake. (Keep the psychrometer measuring the wet bulb temperature at this location for several minutes to get an accurate measurement.)
- Record the indoor return air wet bulb temperature.
- Use the same psychrometer or a different temperature measuring device and measure the dry bulb temperature of the air entering the condenser coil.
- Record the outdoor dry bulb temperature.
- Use a fixed orifice charging chart like the one pictured below to obtain proper superheat.
(Keep the temperature measuring device against the outside grill of the condenser coil for several minutes to get an accurate measurement.)
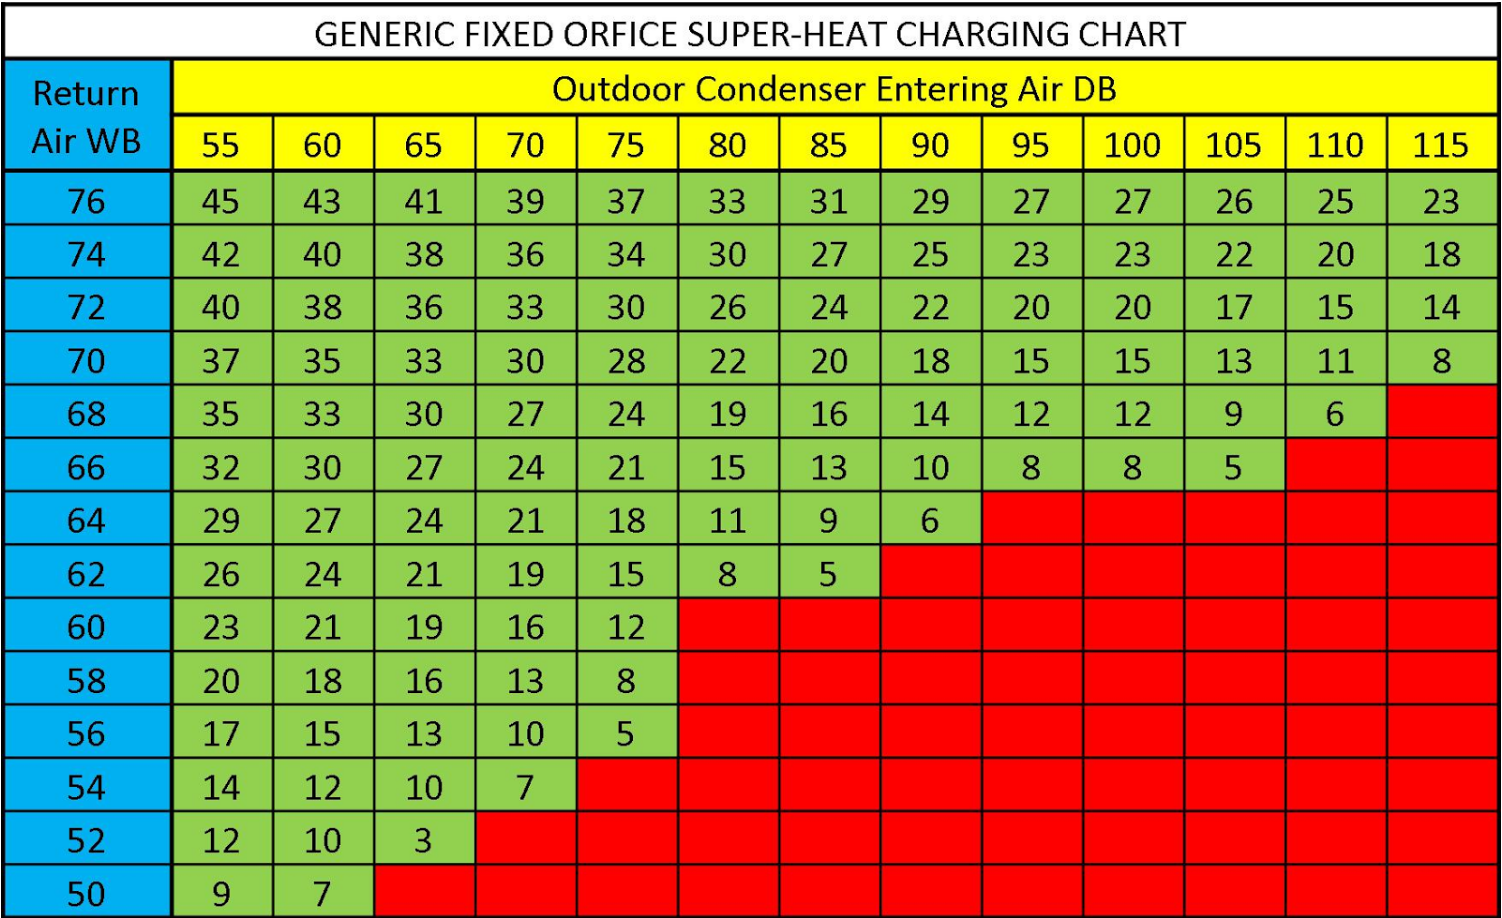
For Example, if the wet bulb temp reading is 68°F and the outdoor dry bulb temp reading is 90°F then the required superheat will be 14°F, according to the charging chart below.
Superheat with a TXV
HVAC systems containing a TXV should be charged by subcool. Thermostatic expansion valves control the flow of refrigerant into the evaporator. The sensing bulb of a TXV monitors suction line temperature and refrigerant pressure is also monitored. The TXV has an internal spring that can, with pressure, act on the diaphragm of the TXV to open or close the device. The opening or closing of the TXV will change the flow rate of refrigerant entering the evaporator. This will affect the measurement of superheat in the HVAC system.
With decreased or increased refrigerant pressure the TXV can change refrigerant flow rate and re-adjust superheat measurements to a desired reading. High side pressure and subcool become the determining factor in charging because of the TXVs ability to change flow rate. Superheat still can be measured though to determine if a TXV is operating properly. Some TXVs can be manually adjusted to change spring pressure and flow rate.
How Superheat Helps in Troubleshooting
Superheat is an important measurement when troubleshooting an HVAC system. Here are some common HVAC issues a technician may encounter and how superheat relates to them. These issues will be based on systems containing a fixed orifice metering device. (Note: these are common HVAC issues and there may be other defects or errors causing improper superheat)
- Low Charge- If refrigerant charge is low, the superheat will be high. The low side pressure will be lower than normal. This indicates the refrigerant absorbed too much heat while traveling through the evaporator.
- Over Charge- If refrigerant charge is high, the superheat will be low. The low side pressure will be higher than normal. This indicates the refrigerant did not absorb enough heat to properly change to a vapor. Liquid refrigerant may enter the compressor if superheat is too low.
- Dirty Evaporator Coil- A dirty air filter, evaporator coil or lack of air flow will cause superheat to measure low. Suction pressure will be low.
- Dirty Condenser Coil- A dirty condenser coil or lack of outdoor air flow will cause superheat to measure high. Suction pressure will be high.
- TXV too open or fixed orifice too large- A metering device that has to large of an orifice will allow too much refrigerant to flood into the evaporator coil, which will cause superheat to be too low. Suction pressure will be high.
- TXV too closed or fixed orifice too small- A metering device that has too small of an orifice will not allow enough refrigerant to enter the evaporator coil, which will cause superheat to be too high. Suction pressure will be low.
How to Alter Superheat
Most HVAC systems encountered by technicians, containing a fixed metering device, will need superheat measurements taken to properly evaluate refrigerant charge. If a charging chart is provided with the equipment you are servicing, then follow that charging chart first. If it is not not available, there are generic charging charts available that give you a reference of proper superheat, based on indoor wet bulb and outdoor dry bulb temperature.
In systems containing TXVs, most systems will require about a 10°F - 15°F superheat with an allowance of approximately +/- 5°F. Systems containing TXVs should be charged by subcool .
Fixed Orifice Metering Device
- If superheat is low and suction pressure is high, recover and remove refrigerant to increase the superheat.
- If superheat is high and suction pressure is low, add more refrigerant to decrease superheat.
Proper Piston size
- The right size piston is important for proper superheat. An improper piston size may under or over feed refrigerant into the evaporator. Size a fixed metering device piston based on the condenser specifications.
Malfunctioning TXV
- If superheat is extremely irregular in a TXV equipped system, and all other diagnostics check to be normal, than either manually adjust the TXV or replace it with new.
Conclusion
In HVAC systems containing a fixed orifice metering device, superheat is the most accurate way to examine proper refrigerant charge. Superheat can be daunting and confusing to new technicians, but hopefully this article gave you some insight and confidence on all things superheat. Now you can battle that summer heat with some arctic chill.